Post by Misty on Mar 28, 2015 0:46:08 GMT
When most people talk about "speed-booking", they mean doing 3 missions for the Hero's Handbook and turning it in. This is kinda speedy, but doing just 5 more missions will get you 5 times as many points, and it also relieves the tedium of doing the same missions over and over. The only EotN mission that really can't be done fast is Destruction's Depths, but Warband of Brothers and A Gate Too Far both require a highly coordinated team with multiple human players, so I skip all 3 of those when I'm working on titles.
Against the Charr
This one is rather quick and easy, and doesn't require any specific skills. You just need a handful of good heroes - hell, do it with henchies if you want. Personally I'd recommend a spirit spammer, some strong caster shutdown, and "Fall Back!". All that needs to be on your heroes though; you and any human players will not be actively taking part in this mission. Accordingly, the less humans in the party, the better. The reason for this is that a lot of the enemies in the mission don't spawn until a human player comes into compass range, so you can flag the heroes across the map and have them fight the end boss without spawning the extra mobs.
As soon as the mission starts, head north and flag your heroes across the bridge to your right. There'll be a group of charr coming towards you over the bridge - make sure the heroes don't get body-blocked and stuck. Don't follow them, and don't kill the charr: you need to die so you can target a hero and see what they're doing. You'll have to wait a while for the charr to stop derping around and actually kill you, or if you're awesome you can bring sacrifice skills and just kill yourself quickly.
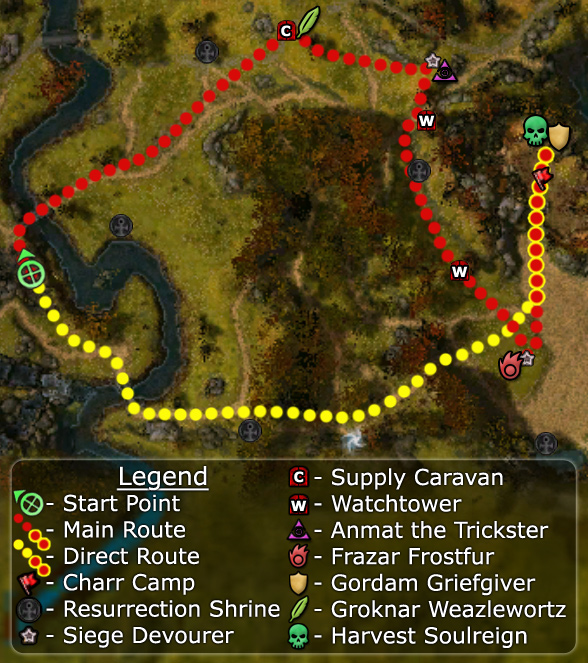
Meanwhile, direct the heroes in a fairly straight line to the charr camp (the red flag on the map). Don't follow the yellow or red dots on the map - just go straight through the forest, past the southern watchtower, and into the camp. At the entrance, you'll encounter a couple of rangers; these can be avoided, but if you do aggro them, just flag the heroes to the east end of the camp, and they'll break aggro. There you'll find a couple of necros; these can also be avoided, but they're easy to kill anyway. After dealing with them, go to the north-east corner of the camp, and you should see Harvest Soulreign and Gordam Griefgiver. Depending on their exact spawn point, it may be possible to aggro them through the wall, in which case they'll run around and you can kill them. If they're too far to the north, you'll have to go round the wall to get them, aggroing a couple of eles along the way. Watch out for their Fire Storm and Meteor Shower: just flag your heroes out of the AoE. Once those two are dead, kill Harvest Soulreign to complete the mission. Gordan Griefgiver can be ignored, although he tends to get himself killed first anyway.
Assault on the Stronghold
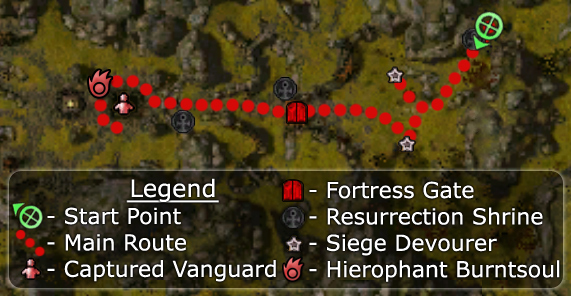
This is one of the shortest missions in Eye of the North, and all you really need is a good team to blast through some charr and destroyers. It's also possible to skip the part with the Armored Saurus, but this is generally more trouble than it's worth, so just do the mission the way you're supposed to!
Curse of the Nornbear
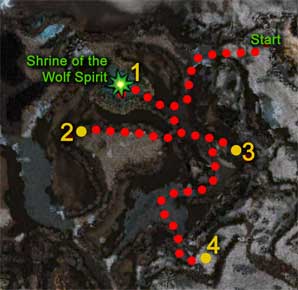
You need a running build for this, but it can pretty easily be done on any profession with secondary assassin, or any build that will allow you to run past the enemies while using the rest of your team as meat shields. Just make sure that the other 7 people in your party have enough single target damage to defeat the Nornbear at the end. If you have other human players in your party, make sure you don't trigger the res shrine at the start. If you, or anyone else in your party, goes close enough to activate it, you'll need to resign. The same is also true if the party wipes without you reaching the res shrine at point 4: this is needed to skip past the enemies.
Run straight to point 2 on the map, where the Nornbear will spawn. You don't need to fight him - just make sure he spawns, and run off to point 3. The same will happen there - trigger the spawn and then run to point 4. There you'll activate a res shrine and spawn the third and final incarnation of the Nornbear. He won't turn hostile for a few seconds, so just run back down the way you came and get yourself killed by the jotun. The rest of the party should also have wiped by now, so you'll res at the shrine in front of the Nornbear. Just kill him to beat the mission!
Blood Washes Blood
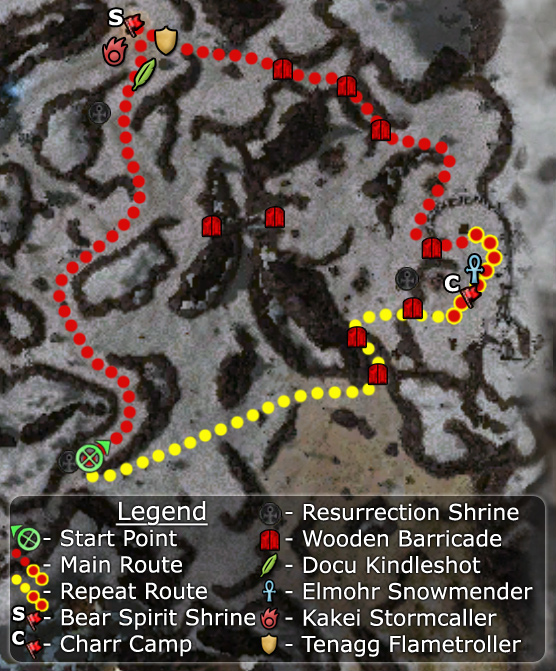
If you've done this before, you can save a lot of time by using Ursan Blessing. The quest to get this is very easy, but you have to do the mission before you can do the quest, so this tactic is only viable on repeats. There is a handy trick to skip a load of enemies on the first play through though - I'll explain that below.
If you have Ursan Blessing, simply follow the yellow route on the map and kill the charr in the fort at the top of the hill. That's all you have to do!
If you don't have Ursan Blessing, follow the yellow route anyway, but about halfway towards the first gate, turn left and head north through a canyon. you'll see a bridge high above you with a couple of charr on it, but you can ignore them and run past. At the end of the canyon, you'll see a group of elementals - avoid these, and you'll emerge in front of the Bear Spirit Shrine. Kill the bosses, get Ursan Aura from the shrine, and complete the mission as normal!
The Elusive Golemancer
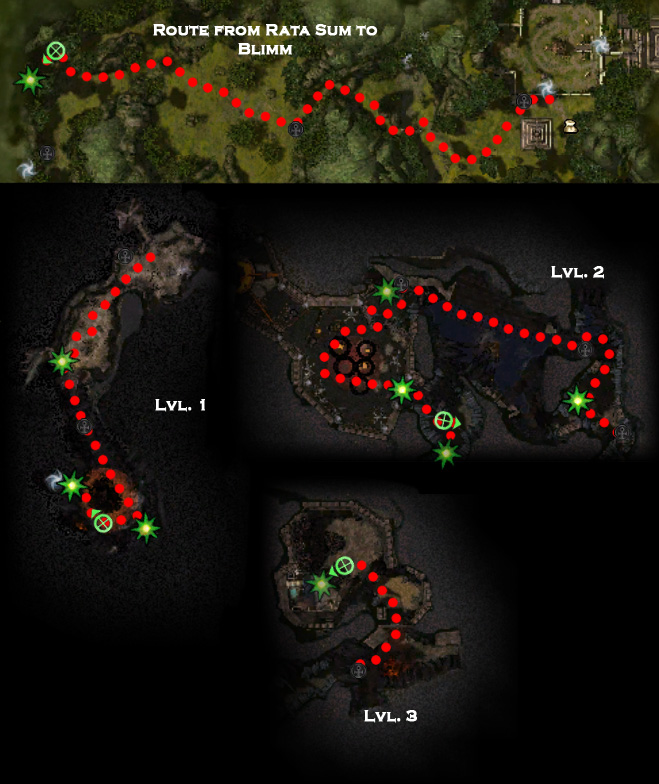
By far the most annoying part of this mission is the run across Magus Stones. Fortunately, this isn't actually part of the mission, and there's a way to skip it. You'll need someone in your party who's done the mission before (presumably you, if you're speed-booking), and someone who still has the pre-quest, Lab Space (you should be able to easily find someone who hasn't done this and will gladly accept a free run of the mission). If their quest log says "Meet Blimm in Magus Stones", you can talk to him outside Rata Sum, and he'll give you an option to start the mission. He'll say there are people in the party who won't receive credit - go ahead and say yes anyway. This will trigger a cutscene, teleporting the party across Magus Stones to right outside the mission. If the person with Lab Space wants to receive credit, kill the Timberland Guardian and let them accept the reward. If you want them to be able to repeat the trick, go straight into the mission and have them abandon and re-take the quest afterwards.
Level 1 requires you to be a tank - a way to make this easy is to bring a monk bonder hero or several. It's also a good idea to bring some assassin skills, particularly Recall. In the first room, you can put Recall on the Worker Golem or a hero, pull the enemies out of the way, and then end Recall - provided you pulled them far enough out of the way, they'll stay exactly where you left them. In the second room, you just have to pull the lever and then survive until the alarm runs out, after which you can zone.
Level 2 is a little trickier. Grab the key from the Mystical Keyholder, and carry it down into the next chamber to place it in the other keyholder. If you drop the key at any point, all the enemies will turn friendly again, so just do that if you think you're about to die. In the next room, you can avoid the enemies and the fire darts by hugging the right wall. You'll aggro the last couple of golems as you run past, but just make sure they don't knock you down and you should be alright. The huge room with the Worker Golems is where Recall is super useful. Cast it on a Worker Golem, pull the enemies out of the way, and end Recall - you can now talk to the Worker Golem and lead it to the pressure plate without it getting aggro. Defeating the Indestructible Golem is pretty straightforward: just grab the Flux Matrix, use it on the Unstable Magical Energy Storage, and drop it next to the boss - repeat until it's dead, making sure not to get close enough for it to smack you around with its mighty fists. You can also use the Flux Matrix to kill the other enemies in the room.
All you have to do on Level 3 is run past a couple of enemies and get to Oola to finish the mission!
Finding the Bloodstone
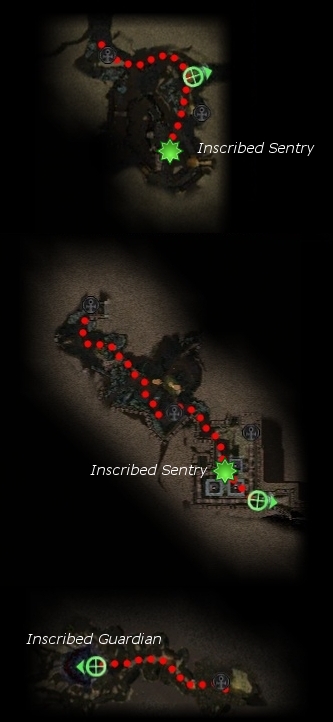
There's no real way to rush this one - running past any group of incubus is almost suicidal, and you have to bring the NPCs with you anyway. That said, it's a reasonably short mission, even though it has 3 levels. For an extra 3,000 rep points (plus 4,500 Asura and 450 more on repeat), it's not a bad time investment.
Genius Operated Living Enchanted Manifestation

This mission is very short and easy, but you'll need at least one hero, and each human player will need a skill that shadow steps to a target ally. At the start, circle around to the left, making sure nobody goes in compass range of the Eastern Golem Kiln. If that appears in the list of allies below the party window, you've messed up and need to start over. To prevent this from happening, go north when you enter the mission, and don't go near Sokka. Flag a hero over there instead - that'll update the quest. In front of the Northern Golem Kiln is a tree trunk bridge - walking up to this will take you in compass range of the other kiln, but you do need to cross. Flag your heroes half way across the bridge, and shadow step to them, cutting the corner and bypassing the kiln. You can then proceed to fight your way up the hill past the waves of destroyers, and then kill the Bringers of Destruction to complete the mission.
A Time for Heroes
Running this is very easy, but it does require special equipment, as detailed on GWPvX. If you can't be bothered getting all that for your character, and don't want to find a runner to do it for you, just run in with Pain Inverter, and make sure you interrupt Lava Wave. Breath of the Great Dwarf and Extinguish are also handy skills to have.
Against the Charr

This one is rather quick and easy, and doesn't require any specific skills. You just need a handful of good heroes - hell, do it with henchies if you want. Personally I'd recommend a spirit spammer, some strong caster shutdown, and "Fall Back!". All that needs to be on your heroes though; you and any human players will not be actively taking part in this mission. Accordingly, the less humans in the party, the better. The reason for this is that a lot of the enemies in the mission don't spawn until a human player comes into compass range, so you can flag the heroes across the map and have them fight the end boss without spawning the extra mobs.
As soon as the mission starts, head north and flag your heroes across the bridge to your right. There'll be a group of charr coming towards you over the bridge - make sure the heroes don't get body-blocked and stuck. Don't follow them, and don't kill the charr: you need to die so you can target a hero and see what they're doing. You'll have to wait a while for the charr to stop derping around and actually kill you, or if you're awesome you can bring sacrifice skills and just kill yourself quickly.
Meanwhile, direct the heroes in a fairly straight line to the charr camp (the red flag on the map). Don't follow the yellow or red dots on the map - just go straight through the forest, past the southern watchtower, and into the camp. At the entrance, you'll encounter a couple of rangers; these can be avoided, but if you do aggro them, just flag the heroes to the east end of the camp, and they'll break aggro. There you'll find a couple of necros; these can also be avoided, but they're easy to kill anyway. After dealing with them, go to the north-east corner of the camp, and you should see Harvest Soulreign and Gordam Griefgiver. Depending on their exact spawn point, it may be possible to aggro them through the wall, in which case they'll run around and you can kill them. If they're too far to the north, you'll have to go round the wall to get them, aggroing a couple of eles along the way. Watch out for their Fire Storm and Meteor Shower: just flag your heroes out of the AoE. Once those two are dead, kill Harvest Soulreign to complete the mission. Gordan Griefgiver can be ignored, although he tends to get himself killed first anyway.
Assault on the Stronghold

This is one of the shortest missions in Eye of the North, and all you really need is a good team to blast through some charr and destroyers. It's also possible to skip the part with the Armored Saurus, but this is generally more trouble than it's worth, so just do the mission the way you're supposed to!

Curse of the Nornbear

You need a running build for this, but it can pretty easily be done on any profession with secondary assassin, or any build that will allow you to run past the enemies while using the rest of your team as meat shields. Just make sure that the other 7 people in your party have enough single target damage to defeat the Nornbear at the end. If you have other human players in your party, make sure you don't trigger the res shrine at the start. If you, or anyone else in your party, goes close enough to activate it, you'll need to resign. The same is also true if the party wipes without you reaching the res shrine at point 4: this is needed to skip past the enemies.
Run straight to point 2 on the map, where the Nornbear will spawn. You don't need to fight him - just make sure he spawns, and run off to point 3. The same will happen there - trigger the spawn and then run to point 4. There you'll activate a res shrine and spawn the third and final incarnation of the Nornbear. He won't turn hostile for a few seconds, so just run back down the way you came and get yourself killed by the jotun. The rest of the party should also have wiped by now, so you'll res at the shrine in front of the Nornbear. Just kill him to beat the mission!
Blood Washes Blood

If you've done this before, you can save a lot of time by using Ursan Blessing. The quest to get this is very easy, but you have to do the mission before you can do the quest, so this tactic is only viable on repeats. There is a handy trick to skip a load of enemies on the first play through though - I'll explain that below.
If you have Ursan Blessing, simply follow the yellow route on the map and kill the charr in the fort at the top of the hill. That's all you have to do!
If you don't have Ursan Blessing, follow the yellow route anyway, but about halfway towards the first gate, turn left and head north through a canyon. you'll see a bridge high above you with a couple of charr on it, but you can ignore them and run past. At the end of the canyon, you'll see a group of elementals - avoid these, and you'll emerge in front of the Bear Spirit Shrine. Kill the bosses, get Ursan Aura from the shrine, and complete the mission as normal!
The Elusive Golemancer

By far the most annoying part of this mission is the run across Magus Stones. Fortunately, this isn't actually part of the mission, and there's a way to skip it. You'll need someone in your party who's done the mission before (presumably you, if you're speed-booking), and someone who still has the pre-quest, Lab Space (you should be able to easily find someone who hasn't done this and will gladly accept a free run of the mission). If their quest log says "Meet Blimm in Magus Stones", you can talk to him outside Rata Sum, and he'll give you an option to start the mission. He'll say there are people in the party who won't receive credit - go ahead and say yes anyway. This will trigger a cutscene, teleporting the party across Magus Stones to right outside the mission. If the person with Lab Space wants to receive credit, kill the Timberland Guardian and let them accept the reward. If you want them to be able to repeat the trick, go straight into the mission and have them abandon and re-take the quest afterwards.
Level 1 requires you to be a tank - a way to make this easy is to bring a monk bonder hero or several. It's also a good idea to bring some assassin skills, particularly Recall. In the first room, you can put Recall on the Worker Golem or a hero, pull the enemies out of the way, and then end Recall - provided you pulled them far enough out of the way, they'll stay exactly where you left them. In the second room, you just have to pull the lever and then survive until the alarm runs out, after which you can zone.
Level 2 is a little trickier. Grab the key from the Mystical Keyholder, and carry it down into the next chamber to place it in the other keyholder. If you drop the key at any point, all the enemies will turn friendly again, so just do that if you think you're about to die. In the next room, you can avoid the enemies and the fire darts by hugging the right wall. You'll aggro the last couple of golems as you run past, but just make sure they don't knock you down and you should be alright. The huge room with the Worker Golems is where Recall is super useful. Cast it on a Worker Golem, pull the enemies out of the way, and end Recall - you can now talk to the Worker Golem and lead it to the pressure plate without it getting aggro. Defeating the Indestructible Golem is pretty straightforward: just grab the Flux Matrix, use it on the Unstable Magical Energy Storage, and drop it next to the boss - repeat until it's dead, making sure not to get close enough for it to smack you around with its mighty fists. You can also use the Flux Matrix to kill the other enemies in the room.
All you have to do on Level 3 is run past a couple of enemies and get to Oola to finish the mission!
Finding the Bloodstone

There's no real way to rush this one - running past any group of incubus is almost suicidal, and you have to bring the NPCs with you anyway. That said, it's a reasonably short mission, even though it has 3 levels. For an extra 3,000 rep points (plus 4,500 Asura and 450 more on repeat), it's not a bad time investment.
Genius Operated Living Enchanted Manifestation

This mission is very short and easy, but you'll need at least one hero, and each human player will need a skill that shadow steps to a target ally. At the start, circle around to the left, making sure nobody goes in compass range of the Eastern Golem Kiln. If that appears in the list of allies below the party window, you've messed up and need to start over. To prevent this from happening, go north when you enter the mission, and don't go near Sokka. Flag a hero over there instead - that'll update the quest. In front of the Northern Golem Kiln is a tree trunk bridge - walking up to this will take you in compass range of the other kiln, but you do need to cross. Flag your heroes half way across the bridge, and shadow step to them, cutting the corner and bypassing the kiln. You can then proceed to fight your way up the hill past the waves of destroyers, and then kill the Bringers of Destruction to complete the mission.
A Time for Heroes
Running this is very easy, but it does require special equipment, as detailed on GWPvX. If you can't be bothered getting all that for your character, and don't want to find a runner to do it for you, just run in with Pain Inverter, and make sure you interrupt Lava Wave. Breath of the Great Dwarf and Extinguish are also handy skills to have.

